When the coffee from your favorite pot starts tasting weird, many people assume their coffeemaker is on the fritz. While that could be the case, it might also be that you’re making some simple, everyday mistakes with your coffee pot. What are some coffee pot mistakes to stop making today?
The most common mistakes with a coffee pot:
- Holding onto your coffee pot for too long
- Not cleaning the coffee pot daily
- Failing to descale
- Pouring in water from the tap
- Using warm, not hot water
- Not trying other types of filters
- Brewing old ground grounds
- Using too few coffee grounds
- Not cleaning the filter basket
- Storing coffee beans improperly
In this article, we’ll talk further about the above 10 coffee pot faux pas as well as how to stop making these errors. You’re on your way to the freshest, most flavorful cups of coffee at home yet!
10 Coffee Pot Mistakes We’re All Guilty Of
Holding onto Your Coffee Pot for Too Long
We’ve written about this on the blog before, but coffee pots do not last forever, not even close. On average, you’ll have a coffee machine for two to five years. The highest-end coffeemakers can last 10 years, but that’s not the norm.
If your coffee pot is barely functional now, how well do you think it will brew a cup of coffee six months from now? A year? It’s just going to get worse and worse. Maybe out of convenience, you keep using the same coffee pot, or perhaps it’s laziness.
Others don’t want to concede that they bought a coffeemaker they don’t like. Why torture yourself though? There’s a vast world of coffee machines out there for you to try, everything from cold brew coffee machines to espresso makers, French press machines, and pour-over coffeemakers.
If you’d rather not throw away a perfectly functional coffee pot, then donate it or recycle it. This will take away some of the guilt you might feel for buying a new coffeemaker when your old one still worked.
Not Cleaning the Pot Daily
The biggest mistake by far that you can make with your coffee pot is not cleaning it daily. Yes, that’s right, daily, as in every single day.
Listen, we get it. If you brew your coffee before work, you might not have time to wash out the pot. By the time you get home after a long day, doing the dishes is at the bottom of your to-do list.
So the next morning, you wake up, and you brew coffee in the same dirty pot. Maybe you give it a cursory rinse with water before brewing, but that’s not really enough to clean it.
Every day, the carafe needs washing with soapy water. Cleaning the carafe ensures that you remove all the old coffee oils, which can turn your coffee bitter and even rotten-tasting if they’ve been clinging to the carafe for long enough. White vinegar is also an excellent alternative to soap.
You can let the carafe air-dry in your drying rack or towel-dry it; that doesn’t matter so much. For every day you use the coffee pot though, you must wash it before you brew it again.
Click the link to read more on how often should you clean your coffee maker.
Failing to Descale
Equally as detrimental as not cleaning your coffee pot is going too long without descaling it.
Tap water is typically hard water, meaning it’s full of minerals such as magnesium and calcium. These minerals can accumulate in your coffeemaker, leading to the development of limescale.
The limescale gunks up the inner workings of your coffee machine and does a number on the flavor of your coffee, making it taste funky. By descaling your coffee pot, you can ensure that limescale can’t wreck your coffee pot, so it’s something you must do.
You should descale your coffeemaker at least once every three months, especially if you use it every day or very close to it.
Urnex Dezcal, which we wrote about here, is a favorite descaling product of coffee lovers everywhere. Dezcal is biodegradable and nontoxic.
You can also shop plenty of other descaling solutions outside of Dezcal, as we talked about in this post. Some other highly recommended products include Essential Values Coffee Machine Descaler & Cleaner, K&J Descaling Solution, Impresa Coffee Machine Descaler, and OXO Brew Natural Descaling Solution.
Pouring in Water Straight from the Tap
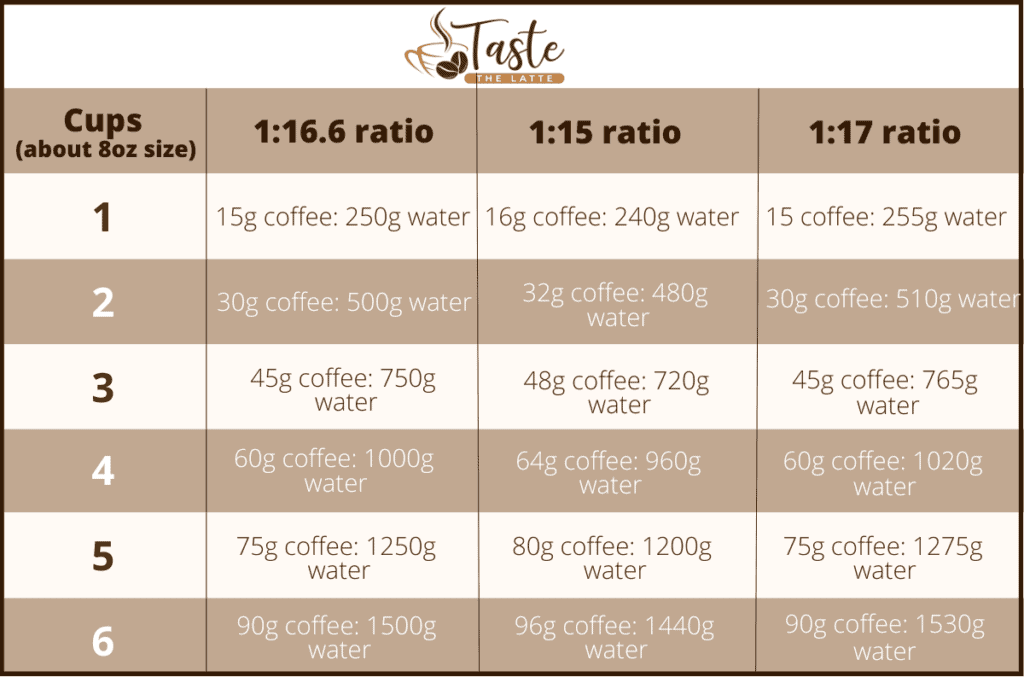
Did you know the ratio of coffee grounds to water is usually 1:17? Yes, that’s one part coffee grounds for every 17 parts water, says coffee roasters Counter Culture Coffee.
If you were preparing a recipe, be it a dinner or a dessert, and there was an important main ingredient, you wouldn’t skimp on its quality, right? Of course, not, as then you know the whole dish might go downhill.
Yet you’d be surprised by how many coffee lovers just use whatever water is most convenient, which is usually straight from the tap. After all, water is just water, right?
Not at all! The problem with tap water is that it’s full of chemicals and minerals. Not only can using this water contribute to scale, but it’s going to interact with the coffee grounds when heated differently than pure, filtered water would.
Now, we’re not saying you need a water reservoir to collect rainwater, but you do want to prioritize using clean water when brewing coffee whenever you can. The water should no have colors or odors, which are two signs that your water contains chemicals and minerals.
To continue reading about the quality of water you should be using, click the link.
Using Warm, Not Hot Water
Besides the quality of the water you use, its temperature is also crucial if you want the perfect cup of coffee at home. Many coffee lovers fall into the trap of thinking that if the water is warm, it suffices, right?
Then their coffee comes out bland and lifeless. The coffee grounds weren’t exposed to enough heat to bring out their true depth of flavor.
How much heat do the coffee grounds require? The water temperature when brewing coffee should be between 195- and 205-degrees Fahrenheit.
It’s not your fault if the water in your coffee pot isn’t being adequately warmed to the necessary extent. Many coffeemakers can’t even heat water to 195 degrees, let alone 205 degrees. If that’s the case with yours, then get rid of it and replace it with a coffee pot that will heat the water until it’s hot enough for a flavorful brew.
Related Reading: Should You Brew Coffee with Boiling Water?
Not Trying Other Types of Coffee Filters
A common complaint among coffee drinkers is that their beverage has a pulpy, almost papery taste. That’s more than likely because you’re using a paper filter. Some people will rinse their paper filters before putting them in the coffee pot to reduce the papery flavor, but the improvement seems to be negligible.
There are plenty more coffee filter types out there for you to sample if you’re beyond sick of papery-tasting coffee. For instance, filters are made of materials such as metal and cloth. Those certainly won’t have a paper flavor.
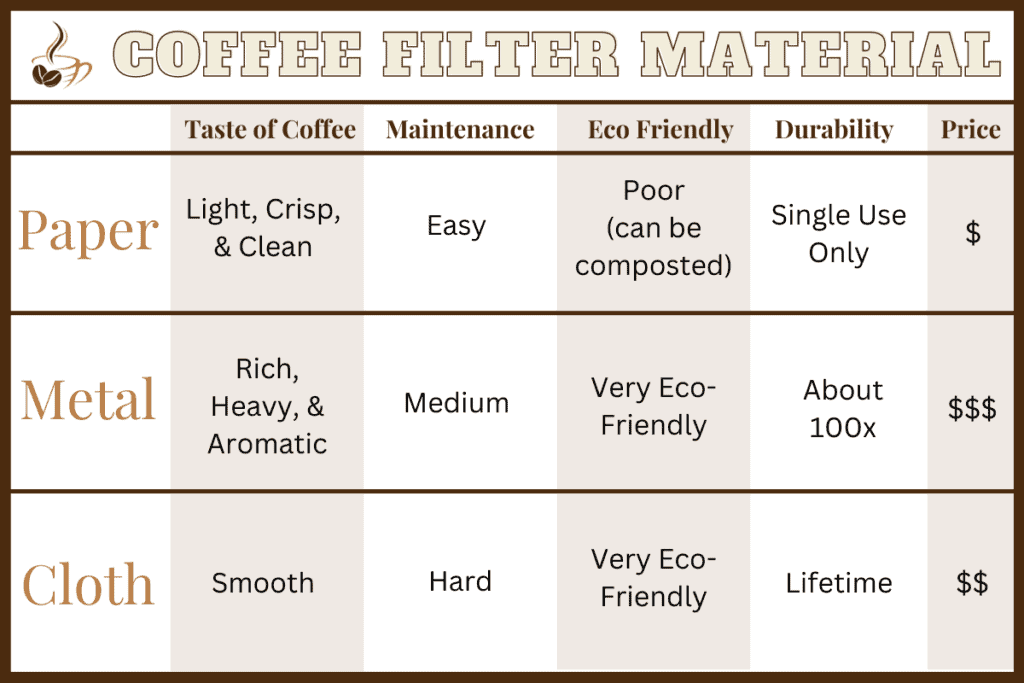
The shape of your coffee filter is also something to switch up occasionally. Cone-shaped filters are one such option and the cupcake wrapper-shaped basket filters are another.

Studies like this one from the University of California Davis Coffee Center have strived to confirm whether the shape of a coffee filter can affect how your coffee tastes. The answer is yes, indeed. Participants in the study were able to tell when they drank coffee brewed with one filter shape versus another.
It appears that water can reach the grounds in differing quantities depending on the shape of the coffee filter, which accounts for the subtle flavor differences between filter shapes.
Click the link to read the pros and cons of each kind of coffee filter.
Brewing Old Coffee Grounds
Are you one of those people who buys your coffee grounds in bulk? You might want to stop doing that.
Grinding coffee beans causes them to release the delicious flavors that make coffee so delectable. If you don’t get to your coffee beans until days or weeks after they’re grounded, it’s no wonder your cup of coffee tastes stale or bland.
You need to use up the coffee grounds much sooner. As soon as the coffee beans come in contact with oxygen they go stale. Avoid letting them sit around for longer than three weeks. Fortunately, you don’t have to guess how long your coffee beans are good. Just check the packaging; the information will usually be there.
Click the link to read more on how to know if your coffee beans have gone bad.
It’s always best to buy pre-ground beans and use a coffee grinder to grind them yourself. But, when should you grind them for optimal coffee flavor and freshness? Ideally, you want to grind the beans the day you plan on brewing them. If that’s not feasible, then grind them the day before, but don’t wait much longer than that!
Using Too Few Coffee Grounds
Here’s a mistake that many coffee enthusiasts don’t even realize they’re making. When the time comes to scoop up their ground coffee (which is fresh, as you now know it should be), they use too little.
This isn’t done out of stinginess; it’s just that they incorrectly eyeball the measurements. Too much water and too little ground coffee will produce a watered-down, flavorless cup.
The National Coffee Association recommends following what they call a Golden Ratio. You need six ounces of water and two tablespoons of coffee grounds. If that’s too much coffee for you, you can always reduce the amount. You can also add more ground coffee if you really want, but the Golden Ratio is golden for a reason.
Yes, it takes maybe a minute more out of your morning to measure the quantities of coffee grounds you add to your coffee pot. Once you begin enjoying a richer depth of coffee flavor in every cup, you won’t mind that extra minute of effort so much.
Ensuring you are brewing with the right amount of coffee can easily be done with a coffee scale. Click the link to read more on why a coffee scale is an essential tool in your kitchen.
Not Cleaning the Filter Basket
Inside your coffee pot is the filter basket, which retains all those coffee grounds during the brewing process. The sludgy, gross-looking grounds post-brew are not something you want to deal with as you blissfully sip on your delightful coffee, so you let the filter basket sit uncleaned.
Just like going too long without washing the carafe, there are unpleasant circumstances associated with a dirty filter basket. It’ll get moldy.
If you think used coffee grounds are gross enough on their own, wait until you see moldy ones. You’d then have to take the time to deep clean every component of your coffee pot before using it again just to ensure its cleanliness.
It’s a lot easier to take two minutes to rinse out the filter basket.
Related Reading: How to Know if my Coffee Maker had Mold?
Storing Coffee Beans Improperly
You know that coffee beans don’t remain infinitely fresh, but you can extend the duration of that freshness by storing them correctly. Provide a room temperature environment for the beans. Keep them in an airtight container that’s opaque (not translucent). Then put them in a dark spot far from the sun or any source of light.
You can freeze coffee beans for a week or two. You again should use an airtight, opaque container and store the beans away from light and heat sources in your freezer.
Although the freezer is an appropriate place to store your beans, never store in the refrigerator. To read why, click here.
Final Thoughts
Everyone makes mistakes, but when it comes to your coffee pot, you want to be as perfect as can be. That’s the only way to ensure your coffee tastes fresh every time. We hope this article gave you some pointers on how to improve the flavor of your coffee!