One of the easiest and fastest ways to make coffee is with a Keurig machine. Its convenience is essential for those early mornings as you run out the door.
Although they are relatively simple to use, you may be surprised about the number of mistakes made by Keurig users. Let’s take a look at the most common mistakes and how to remedy each problem.
Here are the top 10 Keurig coffee mistakes:
- Not unclogging the Keurig
- Not de-scaling
- Brewing with tap water
- Pouring hot coffee into a cold cup
- Irregular cleanings
- Filter isn’t changed regularly
- Buying cheap generic K-cups
- Inadvertently making weak coffee
- Not Adding Spices for Better Flavor
- Not puncturing the K-cup before brewing
To improve the taste of your Keurig coffee, read further to ensure you’re using your machine correctly.
The 10 Most Common Keurig Coffee Maker Mistakes
1. Not Unclogging the Keurig
This first Keurig mistake is one you may not even know you’re doing. Sometimes, a clogged-up Keurig will be unable to brew you caffeinated goodness, but that doesn’t always happen. In some cases, the machine still brews, just not as well as it used to.
What will you notice? The coffee’s steam will be a lot thinner. You may also detect an increased presence of loose coffee grounds in your cup, which makes for quite a gritty, lumpy, and unpleasant texture. Lastly, you’ll notice that the amount of coffee coming out is not a full stream anymore.
What’s the cause? You might assume that your Keurig is getting old, but since it works, you don’t guess something is wrong. The likely cause of these issues is a clog or blockage. If you leave it like it is, it’s only a matter of time before the Keurig stops working.
Most Keurig blockages are caused by unbrewed coffee grounds stuck in the machine. Scale, which we’ll talk about in a moment, can also contribute to the problem.
Anytime your Keurig begins producing coffee in a runny stream with noticeable grounds in the bottom of the cup, you have to unclog it.
What should you do? First, take out the K-Cup holder. Next, detach the pod holder funnel and give that a thorough cleaning. Look for stuck coffee grounds, which you can remove with a small tool like a toothpick or even a paper clip, depending on how fine the grounds are.
From there, wash the filter screen and water reservoir to eliminate debris accumulation. Once it’s all clean, put everything back together. The next time you brew coffee using your Keurig, it will be a different story. The machine will work well again!
2. Not DeScaling the Keurig
When we talk about scale, we are referring to limescale or scale for short.
Limescale naturally accumulates on coffee machines from all sorts of manufacturers, not solely Keurig. If you brew with hard water, then your water contains calcium and magnesium.
Wait a minute, hard water? That’s right. The water that comes out of your taps can be hard or soft.
What will you notice? You can typically tell if you have hard water because scale accumulation is an issue with your coffeemaker and your pipes.
Other signs of hard water include:
- Your glasses and dishware frequently have hard water spots that you can’t easily remove
- These hard water spots are also present in your bathroom, especially in your shower
- Your skin always feels dry no matter what water temperature you use to shower
- When you wash your hands or body, the water leaves a filmy layer that makes it hard to feel clean.
The limescale will continue to build up in your Keurig coffee machine until you use a soft water filter.
What will it cause? The scale accumulation can block holes and openings in the machine, leading to thin streams of coffee or blockages like those mentioned above. Your coffee will also taste more and more bitter.
What should you do? It’s relatively easy to remedy the problem by using a descaler. The descaling process should be performed once every three months to keep it working well and its flavor fresh! The descaling solution I use that works well is found here on Amazon.
Click here to read more on the most common descaling products and which works better.
3. Brewing with Tap Water
Coffee is approximately 98.75 percent water, and less than two percent is coffee. So if coffee is mainly comprised of water, it makes sense why the water you use is so essential to it’s taste.
What will you notice? You’re getting far more flavor than you bargained for if you’re brewing Keurig coffee with tap water, and we aren’t referring to good flavor. Coffee brewed with tap water will taste off, bitter, or downright gross.
What is the cause? According to Joe Cross, the producer of the documentary Fat, Sick & Nearly Dead, tap water can contain a smattering of substances such as arsenic, lead, chlorine, heavy metals, and pesticides.
Besides how wildly unhealthy some of those substances are for your health, there’s also the flavor. If you think you’re not tasting heavy metals or chlorine in tap water, do yourself a favor and try filtered water.
You don’t even have to brew coffee with it quite yet. Just take a big swallow of it after gulping down some tap water. If you wouldn’t want to drink the water plain, then don’t use it for your coffee.
The chlorine in tap water will lead to a bitter flavor. When you consider that your coffee machine might also have a buildup of scale, then it’s no wonder your cup is barely palatable.
What should you do? According to the Specialty Coffee Association of America or SCAA, the water that goes into coffee should be fresh, clean, and odor-free. A simple water filter should remove most harmful minerals and contaminants but still have enough not to damage your coffee machine.
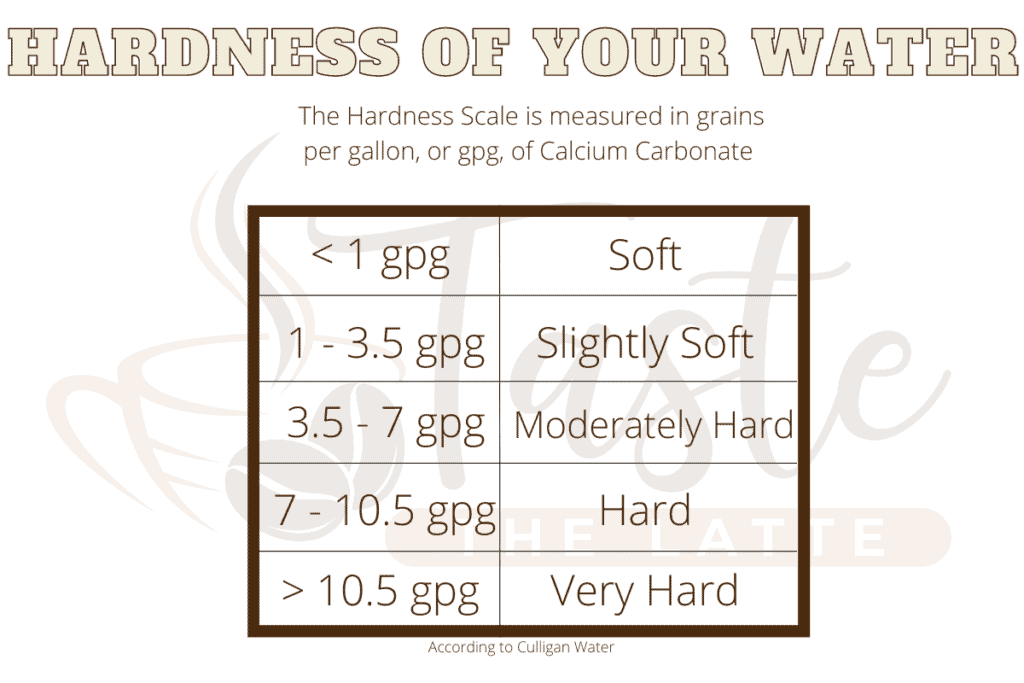
When determining the best water for your coffee, there are three things to consider: hardness, PH, and Total Dissolved Solids, or TDS.
- Hardness: Hard water contains more calcium ions than soft water. Other minerals found in hard water are sulfates, chlorides, bicarbonates, and magnesium carbonates. The target calcium hardness level in water is 68 milligrams per liter or 4 grains. Up to 5 grains and 85 milligrams per liter of calcium hardness is acceptable.
- PH: The PH scale measures whether something is more acidic or basic, aka alkaline. The target goal for water is to have a pH of 7.0, which is perfectly neutral. That said, if the water is slightly more acidic at 6.5 or a little basic at 7.5, that’s okay too.
- Total Dissolved Solid (TDS): Total dissolved solids refer to the salts, organic materials, metals, and minerals that dissolve in water. The lower the TDS measurement, the purer the water is, and thus the higher its quality. The SCAA has a target goal for water used for coffee to contain only 150 milligrams per liter of TDS. Up to 250 milligrams per liter is okay.
Click here to read more about what type of water you should use with your coffee.
4. Pouring Hot Coffee into a Cold Mug
Here’s a common coffee mistake that can affect the flavor of your cup, whether you brew with a Keurig, a Moka pot, or an espresso maker.
What will you notice? Coffee is supposed to emerge from your machine piping hot at about 200 degrees Fahrenheit. If you pour that piping hot coffee into a cold carafe or mug, you’re doing yourself a huge disservice. Then you finish your coffee prepping by stirring in milk, cream, and sugar. All of this cools down the coffee.
The coffee had already begun cooling the moment it touched the cold carafe. By the time you go to take a sip, your coffee tastes lukewarm.
What should you do? There’s a straightforward solution to this problem. Begin heating your carafe or mug before pouring the freshly-brewed Keurig coffee.
We recommend running the carafe under hot sink water and dumping and drying it. You can do the same for your favorite coffee mug or heat it in the microwave for a few seconds if it’s microwave-safe.
Keep repeating this until the mug feels warm but isn’t burning hot.
For some other tips and tricks on how to keep your coffee warm, especially when going out in the cold, click here!
5. Irregular Cleanings
When was the last time you thoroughly cleaned your Keurig coffeemaker from top to bottom? If you can’t recall or have the sheepish response of “never,” then it’s high time for you to change that.
When brewing with a Keurig, the inside of the machine, water reservoir, and all removable parts can get dirty and grow bacteria and mold. Think about it. Any water sitting in a container for days without being cleaned will start growing unpleasant things.
When not washed regularly, the water reservoir is often one of the dirtiest parts of your kitchen.
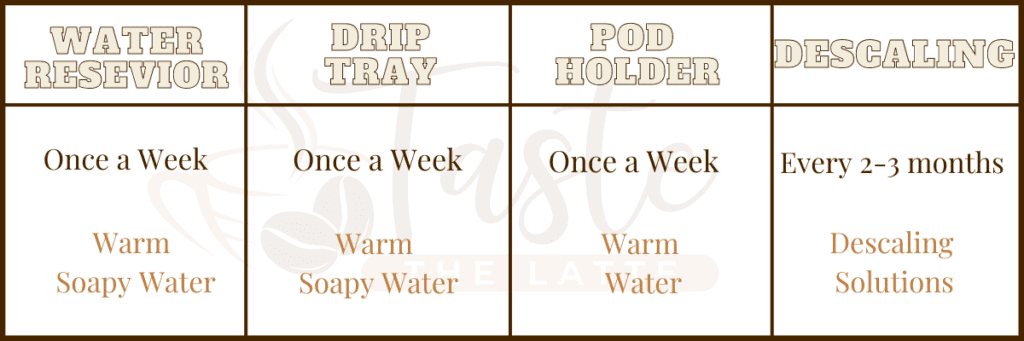
If you use your Keurig daily, we recommend cleaning the water reservoir every week. To clean, remove the reservoir from the device and take off the lid. With warm soapy water, gently clean the inside and outside. Be sure to rinse thoroughly after to ensure no soap remains. You can also use kitchen products like white vinegar or salt.
To clean the drip tray, separate pieces from the machine and again wash with warm soapy water. Keurig does not recommend placing it in the dishwasher, but I’ve cleaned mine in it for years and never had an issue. So, it is up to you.
To clean the pod holder, carefully remove it from the device (you don’t want to get poked by the needle that punctures the K-cup). Wash with only warm water. Either air dry it or place it back into the machine.
Lastly, we have descaling. This is an essential upkeep for your Keurig. Descaling removes mineral build-up and limescale that decreases brewing performance and coffee taste. This should be done every 2 to 3 months, depending on your machine’s use. You can use a commercial coffee machine cleaner such as Cleancaf or Dezcal.
If you commit to this routine, your Keurig will continue working well for a long time!
Click here to read more on how often you should clean your coffee maker.
6. Filter Isn’t Changed Regularly
Most Keurig models aren’t compatible with a reusable coffee filter, especially the third-party reusable filters you might see advertised online.
Instead, you’re stuck with disposable filters.
While you don’t have to dump the Keurig filters after every use, you certainly don’t want to keep yours around forever, either.
If it’s been over two months, you need to change the filter, end of story.
The whole duty of a coffee filter is to trap coffee grounds. However, that’s something your Keurig filter can only do decently well if the filter isn’t well past its lifespan. That’s especially true if we’re talking about paper filters, which are the least durable.
The more coffee grounds that get into your cup, the grittier the texture of your brew will be. You won’t want to use your Keurig if that’s the kind of coffee it’s producing for you!
7. Buying Cheap Generic K-Cups
Keurig coffee machines are big business, as the brand is worth millions and millions of dollars. As K-Cups became increasingly popular, brands outside Keurig wanted to get in on the K-Cup game.
This means that the K-Cup market is oversaturated with options, many of which are well outside the Keurig label.
If you stick to Keurig K-Cups only, you’ll find some flavors you like and some that you don’t, but they’re all about the same quality. Once you get into third-party K-Cup brands, the quality becomes more negligible.
You can generally trust brands like Dunkin’ or Starbucks to produce a good-tasting K-Cup, but it’s a different story for other brands.
Buying cheap K-Cups because they cost less is a tempting proposition; we agree with you. However, if you’ve drunk coffee long enough, it should be no surprise to you at all that you get what you pay for.
If you buy cheap K-Cups, just like cheap coffee beans, you’re sacrificing richness and flavor to keep a couple of bucks in your wallet.
Only you can decide what matters to you, but until you upgrade your K-Cups, your Keurig will continue to make blah coffee.
Related Readings: “Can I Use a K-Cup Twice?” and “Do K-Cups Need to be Refrigerated?“
8. Inadvertently Making Weak Coffee
When brewing with a Keurig or any other coffee machine, the key is to follow the instructions and use the recommended quantities of ingredients.
What will you notice? Although water may comprise more than 98 percent of your coffee, that doesn’t mean you want to overdo it on the water. Then your coffee will be 100 percent water and with practically no flavor.
If your Keurig coffee always tastes watered-down, and you know there’s nothing wrong with your machine, it’s worth taking a few minutes to review the brewing instructions.
What is the cause? Many Keurig models have buttons corresponding to how big your mug may be and will allow more water to go through the machine to fill up your cup. Each K-cup contains about 11 grams of ground coffee, which is enough for a 6-ounce cup.
Some people like their coffee with a bit more water, but if your complaint is that it always tastes watered down, there is a solution.
What should you do? Instead of having watered-down coffee, you have a couple of solutions. First, you can switch to a 6-ounce mug or use two k-cups for one large cup of coffee. Say your mug is 12 ounces. Run it through once with one k-cup and then run it a second time with a second k-cup.
You also have the option to buy a reusable K-Cup. These are great options. First, you can choose any coffee to fill them up. Second, you have complete control over how much coffee you put in them. If your mug size is large, fill the reusable K-Cup to the top.
Your last option is to use the “strong” button available on many Keurig models. When brewing with the “strong” button activated, an additional 30 seconds of brew time will be added. These 30 seconds allow the coffee grounds to seep longer and be further extracted, giving that cup of coffee a strong flavor.
9. Not Adding Spices for Better Flavor
Use additional flavorings besides the overdone cream, milk, and sugar for a truly flavorful cup of Keurig coffee that you’ll look forward to every morning.
We wrote a post with plenty of awesome things to add to coffee for more richness, taste, and decadence.

Spices go really well with coffee, especially allspice, cloves, ginger, nutmeg, star anise, cinnamon, and even cayenne pepper if you’re feeling brave.
In that same vein, unsweetened cocoa powder or a splash of coconut milk ought to really make a difference in how your Keurig coffee tastes.
Related Reading: “How to Infuse Coffee with Cinnamon”
Remember, if your coffee comes out with an absolutely awful flavor, a pinch of salt can really save the day. The salt blocks the bitter and sour notes of coffee so that even an abysmal cup tastes better. Click here to read more about how salt helps your coffee taste less bitter.
10. Not Puncturing the K-Cup Before Brewing
Our last mistake is probably the least known: not puncturing the k-cup before brewing.
Instead of placing a K-Cup in the pod holder, closing the lid, and pressing brew, you’ll want to puncture the K-Cup first. The reason for this is when the pod is placed in the machine, it typically will sit at an angle.
When the lever is pressed down, it is forced to straighten the K-Cup and puncture it simultaneously.
When this occurs, the needle makes a groove in the top of the pod. When the lid is fully closed, the needle now cannot seal the entire hole. This allows extra grind into your coffee and will change how it is extracted.
Final Thoughts
The Keurig is a tough coffee machine to master, and so mistakes are common. Whether you’ve made a few of these mistakes or many of them, what matters most is that you fix them going forward. You’ll enjoy much yummier coffee as a result!
Looking for more ways to improve the taste of your Keurig coffee? Click the link to read how to get the best flavor from a Keurig Coffeemaker.