
There’s nothing like going to your local coffee shop on a cold morning and getting that perfect cup of coffee with those beautiful latte art designs. These added visual accents make your coffee that much more satisfying and enjoyable.
Latte art is typically only done to various specialty drinks, like flat white, cappuccinos and lattes. But does latte art require a specialty drink, or can you make coffee art with regular coffee as well?
Yes, you can make latte art, or coffee art, with regular coffee. Before you run off to experiment with your latte art, the process is not as easy as using an espresso machine with a frother. Latte art can be done in regular coffee if you follow specific steps.
Regular Coffee Compared to Espresso
Espresso beans are typically used to make coffee art. These beans are roasted longer than your typical coffee bean. This longer roasting time creates extremely dark and shiny coffee beans. These espresso beans are ground finer and brewed in an espresso machine.
Brewed espresso beans with an espresso maker produce a stronger and more potent flavor than you would get with regular coffee. Once you have your espresso, add your frothed milk. The espresso flavor becomes more balanced and less intense as the milk is added.
The addition of steamed milk allows you to create those beautiful designs. With regular coffee beans, no espresso machine is required.
How to Make Coffee Art with with a French Press or AeroPress
Since we will be working with regular coffee and not using an espresso machine, it’s important to remember that the flavor won’t be as robust as espresso. I recommend using a darker roast of regular coffee and then either an Aeropress or French Press. This will allow you to create a strong enough coffee similar to espresso.
The main component of making your own latte art is foam. Foam can be made by frothing or steaming.
To read more about what Steamed Milk and Frothed Milk is, click the links.
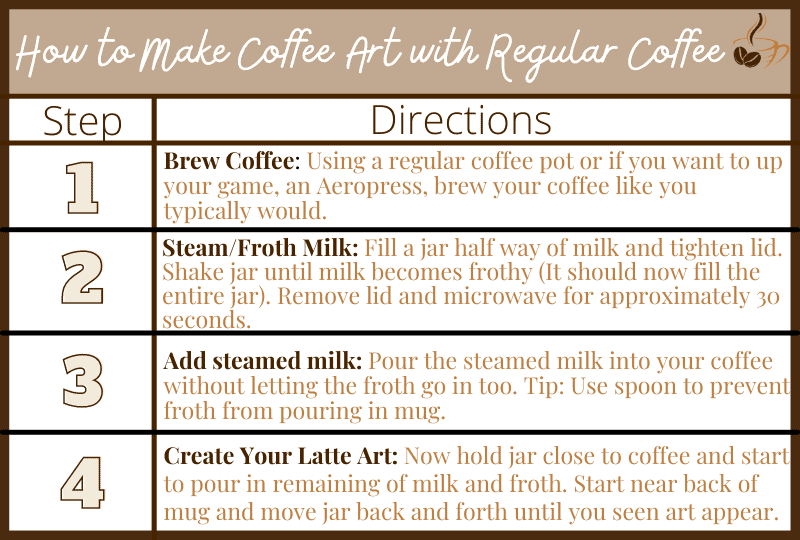
Step 1: Brew the coffee preferably is a French Press or Aeropress. A drip coffee machine will work if you have nothing else.
Step 2: Steam or Froth the milk of your choosing. Place in microwave for 30 seconds.
Step 3: Add your heated milk to a milk pitcher if you have one. This will allow you to have better control of pouring into the coffee. Avoid allowing all the foam to go in yet.
Step 4: Create your latte art by pouring in the remaining milk/froth into your cup. Start near the back of your mug and move back and forth until you see your foam art appear. This takes a little bit of practice.
Best Kind of Milk for Milk Foam & Coffee Art
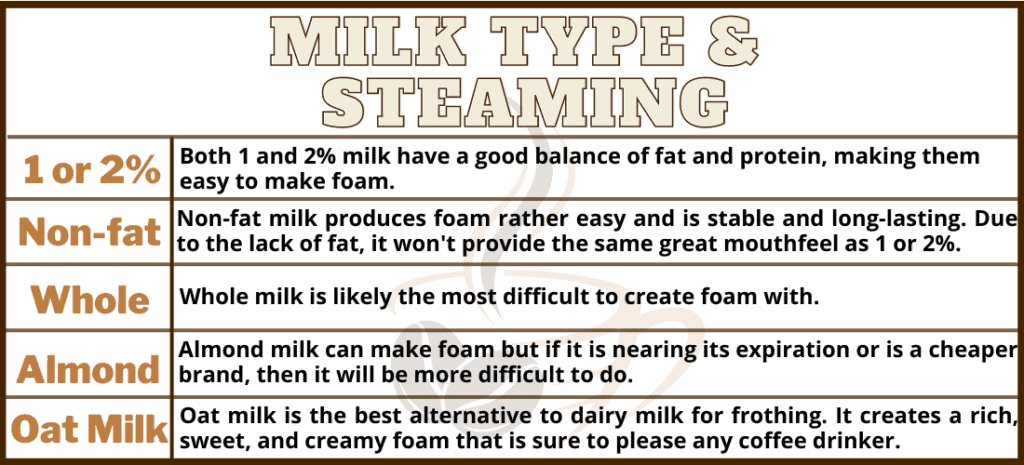
Any milk can be used in creating your froth for coffee art, including whole, non-fat, 2%, almond, oat milk, and even coconut milk.
Whole milk is ranked highest if you are going for the best taste. Due to its higher sugar, high-fat content, and protein content, whole milk will give your coffee a more rich and creamy taste. When frothing whole milk, be sure to show some extra patience and give it a little more time. The air bubbles you obtain from the frothing are weighed down from the larger content of fat in the milk.
2% milk froths quicker than whole milk and produces better microbubbles. Taste-wise, 2% milk will taste very similar to whole milk and is an excellent alternative if you desire a lower fat content but still get the same decadent taste whole milk provides.
Non-fat milk is one of the easier kinds of milk to froth. It effortlessly creates large bubbles that will be stable and long-lasting.
Almond Milk can also be frothed, but it depends on its freshness and brand. Almond milk close to its expiration date will have difficulty frothing. Also, the cheaper brands will affect its ability to froth because they are more watered down, and the almonds’ quality is lesser.
Oat Milk may be the best alternative to dairy milk for frothing. It creates a rich, sweet, and creamy foam that is sure to please any coffee drinker.
Using a Steaming Wand
If you are looking to up your game a little and want to avoid using the microwave to froth your milk, a steaming wand may be something to look into. Microwaves are often tricky to heat milk evenly throughout and avoid overheating, so a steaming wand is a great alternative.
These tools are used in coffee shops by a barista and work by infusing the milk with steam. This creates tiny bubbles, called microfoam, and texture that create the amazing foam we all love. For a great Espresso Machine with a Steamer wand, click here. Below is a video detailing how to froth milk using a steaming wand.
If you don’t necessarily want to spend a couple hundred dollars on an espresso machine, you can purchase a handheld frother. They are easy to use and, best of all, cheap. I recommend the Bean Envy Milk Frother. This powerful handheld frother can give you great foam in a matter of fifteen seconds!
Using a French Press
If you have a french press, I suggest this method over the jar method. A french press works similarly to a hand-pump milk frother. First, heat up the milk and then pour it into the french press, ensuring not to overfill as the milk will increase in volume.
Pump the plunger back and forth until the froth is made. Next, add the foam to your coffee and enjoy!
Using a Jar
A final way to forth your milk if you don’t want to spend any money on a machine or device is by using a simple jar. We chose this method in our above instructions due to the fact that most everyone has an old jar sitting in their kitchen.
First, you are going to fill the jar about 1/2 way full of your favorite kind of milk and securely screw the lid on. Next, vigorously shake the jar until the milk doubles in volume. Depending on what type of milk you are using, this could take up to five minutes, so be patient.
Once the milk has doubled, remove the lid and put it in the microwave for approximately 30 seconds. This will give the milk a smooth and even texture. Finally, pour or spoon foam into your coffee.
How to Make Various Coffee Art Designs
Creating those beautiful coffee art designs in your coffee will take some practice, so don’t give up if it doesn’t turn out quite right your first go around.
Below are some videos to help you with some coffee art designs. The heart is the most basic design. Once you’ve mastered that, you can move on to the tulip. The swan is the more complicated of the three shown.
Some Tips to Help you Get Started
- Hold the coffee mug and tilt it slightly away from you.
- In the other hand, hold your steamed/frothed milk about an inch above your mug and pour the milk in near the top/center. Be sure to pour slowly and steadily.
- Move milk container closer to mug and tip a bit more to slightly speed up your pouring.
- Gently move your hand back and forth to create a zig-zag pattern with milk.
- Bring the coffee mug to an upright position, slow down your pouring, and raise the milk container about an inch.
- You’re finished!
Heart Design
Tulip Design
Swan Design
Final Thoughts
Hopefully, we’ve answered all your questions on making coffee art in regular coffee. Remember, this is an art and requires patience and practice. Don’t get discouraged if it takes you more than a couple of times to get it. It’s worth all your time and effort when you finally get to impress your friends with your new skill!